三分钟彻底搞懂Nginx反向代理
正向代理
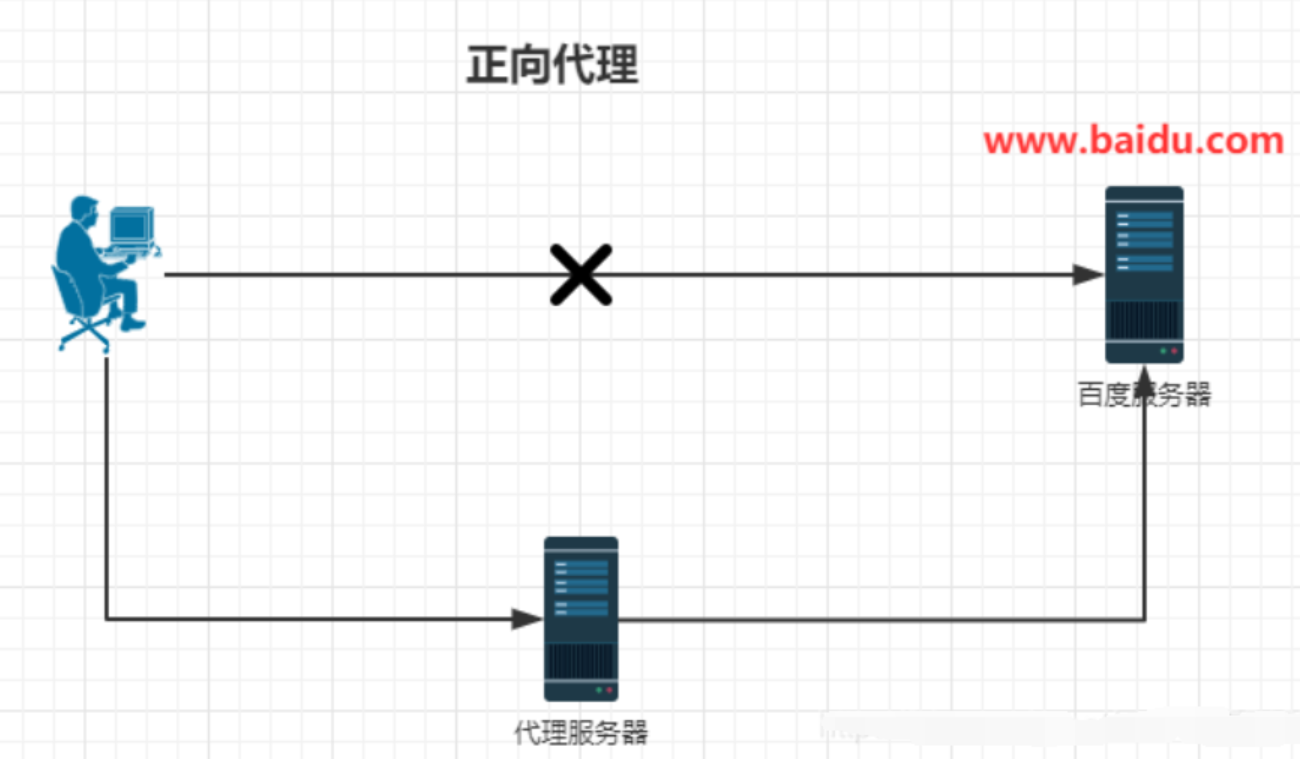
如果把局域网外的Internet想象成一个巨大的资源库,则局域网中的客户端要访问Internet,则需要通过代理服务器来访问,这种代理服务就称为正向代理,下面是正向代理的原理图。
由于工作环境原因,日常工作只能局限于单位的局域网,如果想要访问互联网,怎么办呢?这就需要用到正向代理。

反向代理
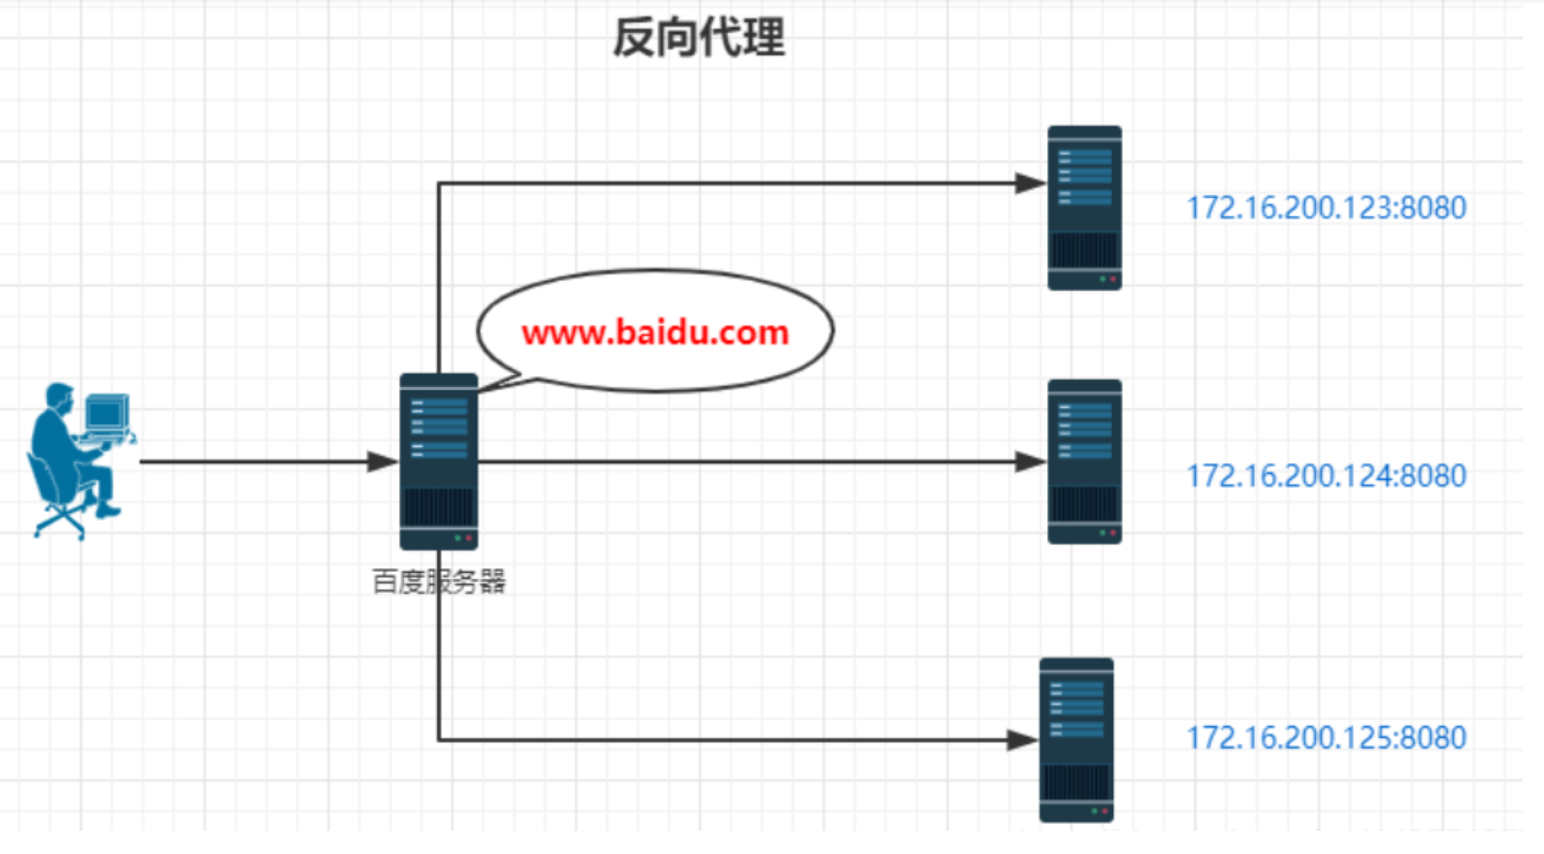
客户端对代理是无感知的,因为客户端不需要任何配置就可以访问,我们只需要将请求发送到反向代理服务器,由反向代理服务器去选择目标服务器获取数据后,在返回给客户端,此时反向代理服务器和目标服务器对外就是一个服务器,暴露的是代理服务器地址,隐藏了真实服务器 IP地址。

正向代理和反向代理的区别
如果我们客户端自己用,就是正向代理。如果是在服务器用,用户无感知,就是反向代理。
Nginx配置文件
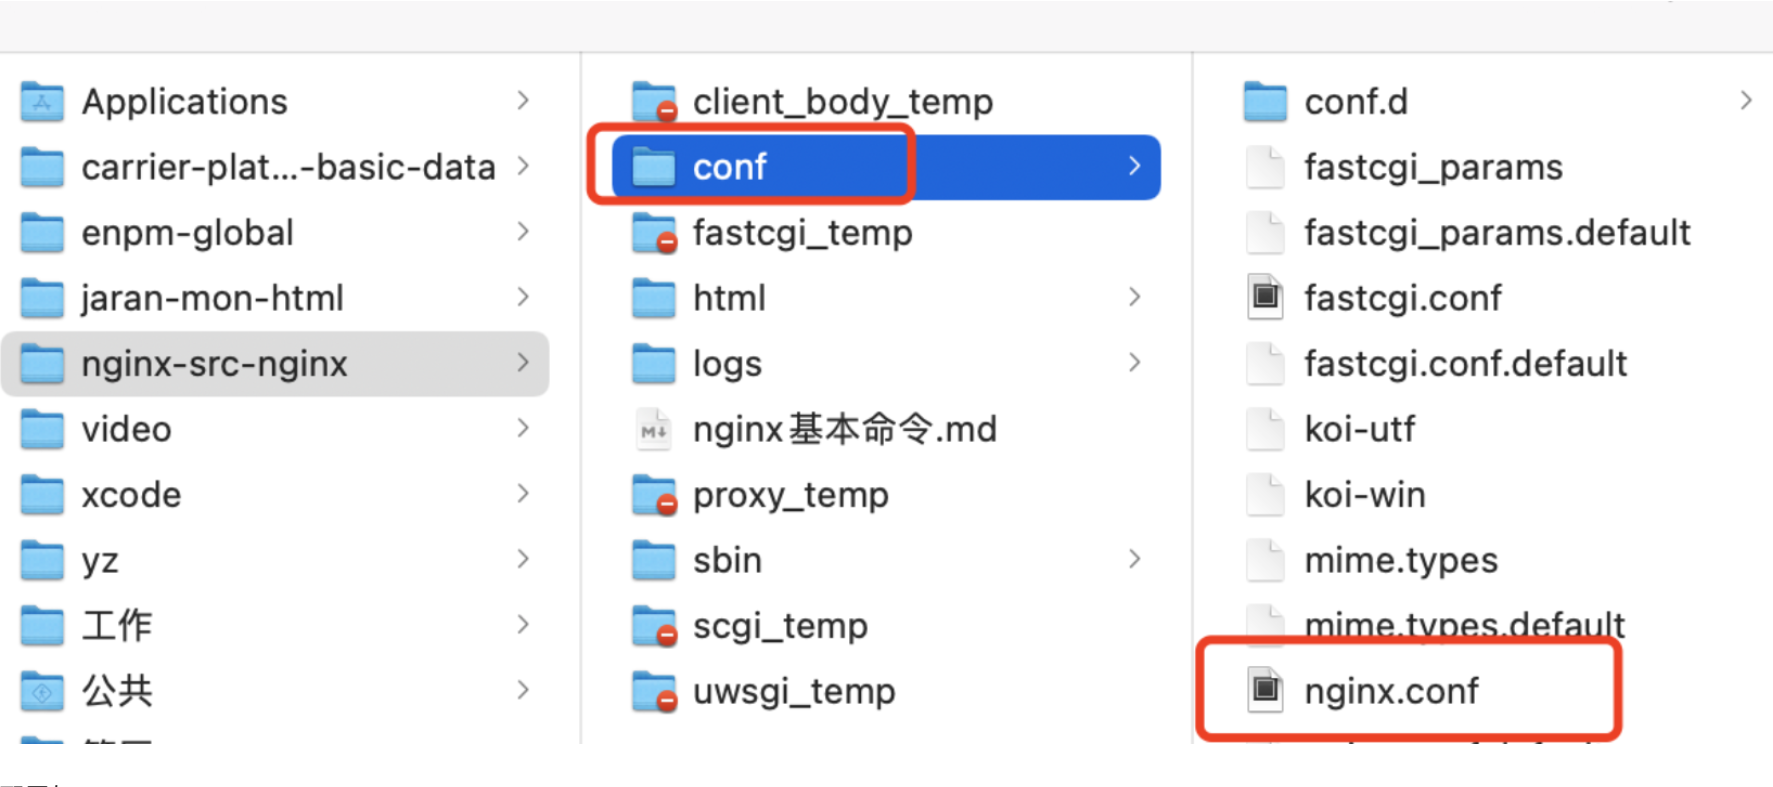
Nginx默认的配置文件是在安装目录下的 conf目录下,后续对 Nginx的使用基本上都是对此配置文件进行相应的修改。完整的配置文件,可以看一下文章最后。修改过nginx.conf配置文件,记得要重启Nginx服务。
配置文件中有很多#号,该符号表示注释内容,去掉所有以 #开头的段落,精简之后的配置文件内容如下(PS:其实注释掉的地方,都是一些功能的使用代码,需要用到的时候,取消注释即可):
# 主进程叫master,负责管理子进程,子进程叫worker
# worker_processes配置项表示开启几个业务进程,一般和cpu核数有关
worker_processes  1;

events {
    worker_connections  1024;
}

http {
	# include表示可以引入其他文件,此处表示引入http mime类型
    include       mime.types;
    default_type  application/octet-stream;
    sendfile        on;
    keepalive_timeout  65;

	# 虚拟主机,可以配置多个
    server {
        listen       80;
        server_name  localhost;

        location / {
        	# 路径匹配之后,哪个目录下去匹配相应的网页,html是相对路径
            root   html;
            index  index.html index.htm;
        }

        error_page   500 502 503 504  /50x.html;
        location = /50x.html {
            root   html;
        }
	}
去掉注释信息后,可以将 nginx.conf 配置文件分为三部分:
第一部分:全局块
worker_processes 1;
从配置文件开始到events块之间的内容,主要会设置一些影响Nginx服务器整体运行的配置指令,主要包括:配置运行Nginx服务器的用户(组)、允许生成的 worker process 数,进程PID存放路径、日志存放路径和类型以及配置文件的引入等。
上面这行 worker_processes 配置,是 Nginx 服务器并发处理服务的关键配置,该值越大,可以支持的并发处理量也越多,但是会受到硬件、软件等设备的约束。
第二部分:events 块
events {
   worker_connections  1024;
}
events 块涉及的指令主要影响Nginx服务器与用户的网络连接,常用的设置包括:是否开启对多 work process下的网络连接进行序列化,是否允许同时接收多个网络连接,选取哪种事件驱动模型来处理连接请求,每个 work process 可以同时支持的最大连接数等
上述例子就表示每个 work process 支持的最大连接数为 1024。这部分的配置对Nginx的性能影响较大,在实际中应该灵活配置。
第三部分:http 块
http {
    include       mime.types;
    default_type  application/octet-stream;
    sendfile        on;
    keepalive_timeout  65;

    server {
        listen       80;
        server_name  localhost;

        location / {
            root   html;
            index  index.html index.htm;
        }

        error_page   500 502 503 504  /50x.html;
        location = /50x.html {
            root   html;
    }
}
这部分是 Nginx 服务器配置中最频繁的部分,代理、缓存和日志定义等绝大多数功能和第三方模块的配置都在这里。需要注意的是:http 块也可以包括 http 全局块、server 块。下面的反向代理、动静分离、负载均衡都是在这部分中配置
http 全局块:http 全局块配置的指令包括:文件引入、MIME-TYPE 定义、日志自定义、连接超时时间、单链接请求数上限等。
server 块:这块和虚拟主机有密切关系,从用户角度看,虚拟主机和一台独立的硬件主机是完全一样的,该技术的产生是为了节省互联网服务器硬件成本。
每个http块可以包括多个server块,而每个server块就相当于一个虚拟主机。而每个server块也分为全局server块,以及可以同时包含多个locaton块。(☆☆☆☆☆)
全局 server 块
最常见的配置是本虚拟机主机的监听配置和本虚拟主机的名称或IP配置。
location 块
一个 server 块可以配置多个 location 块。
这块的主要作用是:基于 Nginx 服务器接收到的请求字符串(例如 server_name/uri-string),对虚拟主机名称(也可以是 IP 别名)之外的字符串(例如 前面的 /uri-string)进行匹配,对特定的请求进行处理。地址定向、数据缓存和应答控制等功能,还有许多第三方模块的配置也在这里进行。
http {
    include       mime.types;
    default_type  application/octet-stream;
    sendfile        on;
    keepalive_timeout  65;

    server {
        listen       80;
        server_name  localhost;

        # 若请求路径像这样:www.xxxx/img/example.png
        # 则访问/img/目录下的文件时,nginx会去/var/www/image/img/目录下找文件
        location /img/ {
            root /var/www/image;
        }

        error_page   500 502 503 504  /50x.html;
        location = /50x.html {
            root   html;
    }
}
反向代理如何配置
使用 Nginx 反向代理,访问www.123.com直接跳转到127.0.0.1:8080
此处如果要想从www.123.com跳转到本机指定的ip,需要修改本机的hosts文件。
配置代码
server {
	listen       80;
	server_name  192.168.17.129;

	location / {
		root   html;
		index  index.html index.htm;
		proxy_pass  http://127.0.0.1:8080
	}
}
如上配置,Nginx监听 80端口,访问域名为www.123.com(不加端口号时默认为 80端口),故访问该域名时会跳转到 127.0.0.1:8080 路径上。
此处的意思为:nginx 反向代理服务监听 192.168.17.129的80端口,如果有请求过来,则转到proxy_pass配置的对应服务器上,仅此而已。
在location下,同时配置root和proxy_pass选项时,两个选项只会二选一执行
此处不能配置https反向代理
使用 Nginx 反向代理,根据访问的路径跳转到不同端口的服务中,Nginx 监听端口为 9001
访问http://192.168.17.129/edu/直接跳转到 127.0.0.1:8080
访问http://192.168.17.129/vod/直接跳转到 127.0.0.1:8081
第一步,需要准备两个 tomcat,一个 8080 端口,一个 8081 端口,并准备好测试的页面
第二步,修改 nginx 的配置文件,在 http 块中配置 server
server {
	listen       9001;
	server_name  192.168.17.129;

	location ~ /edu/ {
		proxy_pass  http://127.0.0.1:8080
	}

	location ~ /vod/ {
		proxy_pass  http://127.0.0.1:8081
	}
}
根据上面的配置,当请求到达 Nginx 反向代理服务器时,会根据请求路径不同进行分发到不同的服务上。
location 指令说明
该指令用于匹配 URL, 语法如下:
location [ = | ~ | ~* | ^~] uri {

}
= :用于不含正则表达式的 uri 前,要求请求字符串与 uri 严格匹配,如果匹配成功,就停止继续向下搜索并立即处理该请求
~:用于表示 uri 包含正则表达式,并且区分大小写
~*:用于表示 uri 包含正则表达式,并且不区分大小写
^~:用于不含正则表达式的 uri 前,要求 Nginx 服务器找到标识 uri 和请求。字符串匹配度最高的 location 后,立即使用此 location 处理请求,而不再使用 location块中的正则 uri 和请求字符串做匹配。
注意:如果 uri 包含正则表达式,则必须要有 ~ 或者 ~* 标识
Nginx完整配置文件
#user  nobody;
worker_processes  1;

#error_log  logs/error.log;
#error_log  logs/error.log  notice;
#error_log  logs/error.log  info;

#pid        logs/nginx.pid;

events {
    worker_connections  1024;
}

http {
    include       mime.types;
    default_type  application/octet-stream;

    #log_format  main  '$remote_addr - $remote_user [$time_local] "$request" '
    #                  '$status $body_bytes_sent "$http_referer" '
    #                  '"$http_user_agent" "$http_x_forwarded_for"';

    #access_log  logs/access.log  main;

    sendfile        on;
    #tcp_nopush     on;

    #keepalive_timeout  0;
    keepalive_timeout  65;

    #gzip  on;

    server {
        listen       80;
        server_name  localhost;

        #charset koi8-r;

        #access_log  logs/host.access.log  main;

        location / {
            root   html;
            index  index.html index.htm;
        }

        #error_page  404              /404.html;

        # redirect server error pages to the static page /50x.html
        #
        error_page   500 502 503 504  /50x.html;
        location = /50x.html {
            root   html;
        }

        # proxy the PHP scripts to Apache listening on 127.0.0.1:80
        #
        #location ~ \.php$ {
        #    proxy_pass   http://127.0.0.1;
        #}

        # pass the PHP scripts to FastCGI server listening on 127.0.0.1:9000
        #
        #location ~ \.php$ {
        #    root           html;
        #    fastcgi_pass   127.0.0.1:9000;
        #    fastcgi_index  index.php;
        #    fastcgi_param  SCRIPT_FILENAME  /scripts$fastcgi_script_name;
        #    include        fastcgi_params;
        #}

        # deny access to .htaccess files, if Apache's document root
        # concurs with nginx's one
        #
        #location ~ /\.ht {
        #    deny  all;
        #}
    }
    # another virtual host using mix of IP-, name-, and port-based configuration
    #
    #server {
    #    listen       8000;
    #    listen       somename:8080;
    #    server_name  somename  alias  another.alias;
    #    location / {
    #        root   html;
    #        index  index.html index.htm;
    #    }
    #}
    # HTTPS server
    #
    #server {
    #    listen       443 ssl;
    #    server_name  localhost;
    #    ssl_certificate      cert.pem;
    #    ssl_certificate_key  cert.key;

    #    ssl_session_cache    shared:SSL:1m;
    #    ssl_session_timeout  5m;

    #    ssl_ciphers  HIGH:!aNULL:!MD5;
    #    ssl_prefer_server_ciphers  on;

    #    location / {
    #        root   html;
    #        index  index.html index.htm;
    #    }
    #}
}
非框架开发时,配置本地nginx反向代理
首先在本地下载nginx,后找到conf文件夹->nginx.conf

配置如下
worker_processes  1;
events {
    worker_connections  1024;
}
http {
    include       mime.types;
    default_type  application/octet-stream;
    sendfile        on;
    keepalive_timeout  65;
    include conf.d/*.conf;
    proxy_cache off;
}
然后在当前文件夹下创建conf.d文件夹,每次配置的的反向代理文件都应是以.conf结尾的。如dev-test.conf

server {
    listen           80;
    server_name       dev.test.com; # 后端配置的白名单域名
    root /Users/yanzhe/yz/xinao/workspace/app-h5; # 本地代码存放位置

	location ~ \.(gif|htm|html|swf|js|css|jpg|jpeg|png|bmp|ico|wma|wmv|asf|mp3|mmf|zip|rar|flv|md|txt|woff|ttf|woff2|wav|apk|xls|docx|pdf)$ {
        index index.html index.htm;
    }

    location / {
       proxy_pass http://www.baidu.com; # 后端接口
	}
}
如果注释文字会报错请删除
最后一步:将白名单加入到hosts文件中,如我示例中的就应该配置成
127.0.0.1 dev.test.com
按如上步骤配置好后启动nginx服务,命令即为nginx,如已启动nginx,则每次修改nginx文件都需要重启才生效,重启命令为nginx -s reload;如果想停止nginx服务,可以使用命令nginx -s stop。nginx服务启动后,此时访问dev.test.com则能够访问在nginx配置的文件内容,同时当请求配置的后端接口时,都会走nginx服务,不会存在跨域问题。
几个注意点:1. 问后端要白名单;2. 要把白名单域名加入到hosts文件中。
另补充知识点:mac修改hosts文件,可在命令行中输入vim /etc/hosts,输入i,进入修改文件模式,修改完成后按下esc按钮,输入:wq退出并保存当前文件。
使用vue-cli开发时
如果是使用vue的脚手架来开发项目时,整个配置变得非常简单。
可以查看文档:https://cli.vuejs.org/zh/config/#devserver-proxy
只需要在vue.config.js中配置devServer
  devServer: {
    host: "localhost",//配置本项目运行主机
    port: 8080,//配置本项目运行端口
    //配置代理服务器来解决跨域问题
    proxy: {
      // ‘/api’ 的作用就是 替换 baseURL 的,假如这里我用的 localhost:8080 ,前端请求时直接用 /api 就行了
      //  ‘/api’ 只在前端请求时添加,而后端不需要添加 /api 这个路径
      "/api": {
        target: "http://xxx.com", //配置要替换的后台接口地址
        changOrigin: true, //配置允许改变Origin
        ws: true, // proxy websockets
        pathRewrite: {
          "^/api": "/",
          //pathRewrite: {'^/api': '/'} 重写之后url为 http://localhost:8080/xxxx
          //pathRewrite: {'^/api': '/api'} 重写之后url为http://localhost:8080/api/xxxx
        },
      },
    },
  },
/api: {},就是告诉node, 接口只要是/api开头的才用代理,所以接口就要这么写 /api/xx/xx. 最后代理的路径就是 http://xxx.xx.com/api/xx/xx.
pathRewrite的作用是因为正确的接口路径是没有/api的,所以需要用^/api: /,表示请求接口时去掉api。


